.png)


Monday, December 21, 2009
Wednesday, December 16, 2009
Feeling a little stoned...
Visions of little paper squares danced through their heads...
I've been cutting and pasting (a very technical skill) little carton rectangles onto my house to create a stone block effect. I think it's working quite well although my lines are a little wobbly here and there. I won't get an honorary ticket from the masonry guild, but I think it looks fairly realistic. I was hoping to do some Christmas decorating on the house this year, but maybe It'll have to wait until next year. Merry Christmas, to whomever's out there in cyber dollhouse land!


I've been cutting and pasting (a very technical skill) little carton rectangles onto my house to create a stone block effect. I think it's working quite well although my lines are a little wobbly here and there. I won't get an honorary ticket from the masonry guild, but I think it looks fairly realistic. I was hoping to do some Christmas decorating on the house this year, but maybe It'll have to wait until next year. Merry Christmas, to whomever's out there in cyber dollhouse land!


Thursday, December 3, 2009
Just messin' around...
Well, I'm currently working on flooring and painting the balcony and front porch. Here are a few pictures of that and just some messin' around with the camera and some close-ups.


Wednesday, November 25, 2009
Dormer Windows and French Door
I've finished the dormer windows in the roof/3rd floor, and the French door to the balcony. (The bathroom wallpaper in the first picture looks purple but is actually dark red, like the roses in the bedroom in the second picture.)


Monday, November 2, 2009
Front Door is In!
Here is the front door installed. It was a real challenge to get everything to fit. Thought I was so smart putting real hinges in so it would work. Looks good, but doesn't open too wide. I have to remind myself though that no one will actually be going in and out of the door, so it doesn't matter much.


Tuesday, October 27, 2009
Bay Windows are In
I've finished putting the windows in the parlour bays - makes the room look much more finished. The staircases and doors are not finished and not glued in yet...just wanted to see what it will all roughly look like. Here are some pictures:


Sunday, October 25, 2009
Greenleaf Miniature Community
For anyone who's interested in seeing more of my pictures, or seeing what other miniaturists are doing, here's a create website to browse around in. Here's a link to my gallery. Click on any picture and it will take you to that full album where you can see all the pictures and comments down below.
http://www.greenleafdollhouses.com/forum/index.php?autocom=gallery&req=user&user=4385
You can then click on the word Gallery above on the same page to view other folks' miniatures and houses.
http://www.greenleafdollhouses.com/forum/index.php?autocom=gallery&req=user&user=4385
You can then click on the word Gallery above on the same page to view other folks' miniatures and houses.
Sunday, October 4, 2009


Thursday, June 11, 2009
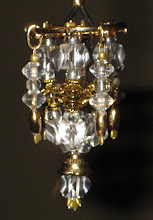
Dollhouse Chandeliers
 Hey there! I've been working on lighting for the main floor of my dollhouse. I've made 3 so far and they are composed of jewellery beads, findings and crystals. There are also little 12v light bulbs inside each that will hopefully still light up when all the wiring is done. The candles were made with drinking straws cut to fit around the base of the little flame bulbs. See my gallery at the link below for more pictures.
Friday, June 5, 2009
Tile Flooring Installed
 Out of sheer laziness I've decided to provide a link to my latest project rather that to recreate it here again. I have gotten involved in a community website/blog/gallery for mini enthusiasts and it seems there is more interest there (go figure) in the mini stuff I'm doing.
 However, for those who might pop in here now and then to see what's new, I'm adding a link which will take you to my gallery of pictures of the flooring I've installed in the dollhouse on the main floor:
Thanks for checking in!
Monday, May 25, 2009
Well, I have started to work on the Beacon Hill once again. I have ordered a bunch of building components and starting installing them. These include a curved staircase for the main floor and a straight one for the second floor, some railing and newel posts, and some interior doors. I have decided to partake in what my learned fellow mini enthusiasts call "kit bashing", which involves taking a kit with specific instructions, and not following them. Heehee. Here's what I've done:


First I removed the old stairs - too rough for me.
Here is the new staircase - nice eh? Can't take credit for this one!

Then, I cut a larger opening in the second floor hallway to accomodate the new curved stairs - don't want the little folks bumping their heads on the ceiling!

I cut the middle wall out of the first floor between the hall and the living room to make one grand room. The stairs will sit on the left front of this picture.
Then I decided to put in doors inside - French doors to be exact. Here on the left you see the one I'm putting in the bedroom and across the hall will be the bathroom, both on the third floor. This was open to the hallway, so I needed to put in a doorframe/wall.


Here is the doorframe put in and glued, and below with the double panel door fitted in.


I've also put a double french door in the big room on the second floor.

Here is the whole interior with doors installed - I need to get an extra narrow one for the second floor kitchen, and I found one - yay! I'll now have to remove them for painting, flooring, wallpapering, etc. Thanks for visiting!
For any of you who are interested in seeing what others are doing mini-wise I recommend the following blog. I am now a member here and enjoying conversations with others with this "obsession".
My codename there is cjme63 and you can view my gallery and posts there as well.
Subscribe to:
Posts (Atom)